
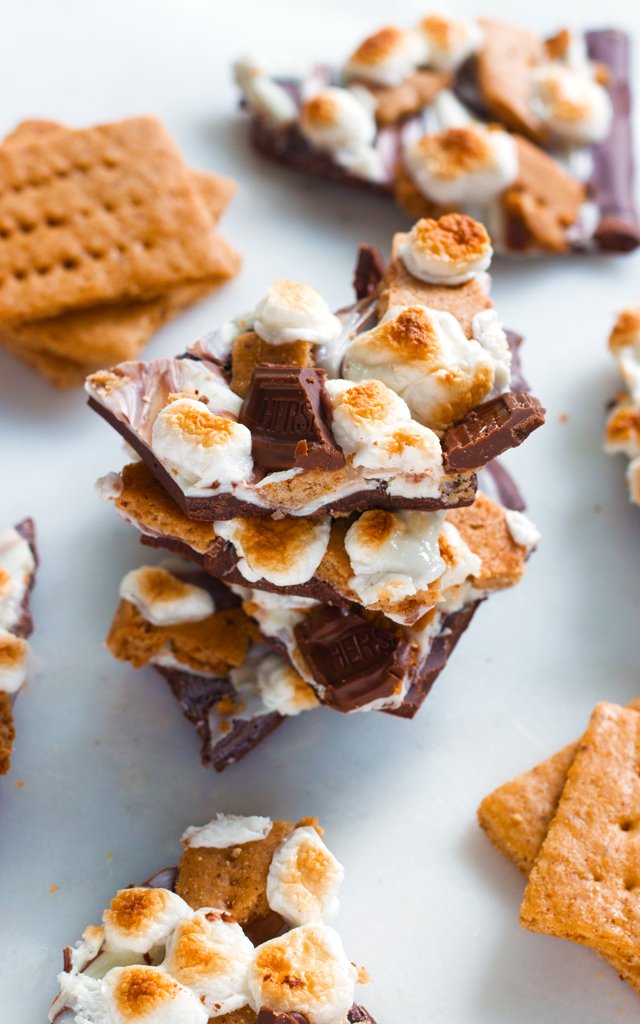
Mary berry S’mores Bark [Gluten-Free]
Guys, I’ve never been so sick in my life. Lake sick, that is.
It’s a feeling sort of like homesickness, and kind of like post-vacation blues, but 100x worse.
A couple weeks ago I was able to head up to my parents’ lake house (turned full-time retirement pad) to spend the week working from there and spending oodles of time with them outside of my 9-5, and oh my goodness was it glorious. There’s something about cool morning runs, followed by a workday with a backdrop of ducks and sailboats floating along, followed by a cool drink out on the dock, topped off with a campfire and S’MORES to wind the evening down – it just can’t be beat.
TAKE ME BACK.

Don’t get me wrong, I absolutely love city life. But the #1 thing that is missing? The easy access to campfires. Generally speaking, they’re frowned upon in densely populated urban areas. Go figure 😉
But when lake withdrawal – aka s’mores withdrawal – is in full effect and there are sadly no campfires within a good 25 mile radius, something has to be done. Sure, no-churn s’mores ice cream is a great option, but sometimes a girl needs something a little more literal with an in-your-face s’mores punch. And that, my friends, is how this glorious bark came to be. It’s basically the next best thing to being campfire-side.

The beauty of bark is that it also takes almost the same amount of time to make as it would take to make an actual s’more, especially if you go the route of melting your chocolate in the microwave instead of over the stove – which I extra highly recommend considering the heatwave we’ve been having here in the northeast.
It’s super easy, too! The hardest part is keeping a close eye on the marshmallows while toasting them under the broiler to make sure they get perfectly toasty but 0% burnt, which – WARNING – can happen in a matter of seconds. Literally seconds. Not that I have any experience in that department…..
Speaking of seconds (and the excessive heat around these parts) I PROMISE that this recipe requires your oven to be on for no more than 1-2 minutes tops. Which, when you think about it, might even give this s’mores bark a leg-up on the traditional campfire version. No sitting by a hot flame in 90 degree weather, but I can still have one of my my favorite summertime treats? Maybe city life wins after all. 😉

As always, when making bark, be sure to use high quality chocolate. I simply cannot stress this enough! The quality of your bark will only be as good as the quality of your chocolate, so if there’s ever a time to splurge, this is it. Just make sure the chocolate you are using is gluten-free. I’ve been shocked to discover just how many of the gourmet chocolate brands have gluten as an ingredient, so keep an eye out!
You’ll also want to make sure you are using a high-quality gluten-free graham cracker. Just like with the chocolate, the better the graham, the better the s’mores bark! I am, of course, extremely partial to my homemade gluten-free graham crackers, but if you’re in a pinch for time/don’t want to turn on your oven, there are more and more great pre-made gluten-free alternatives coming out on the market.
If you’re feeling EXTRA fancy, feel free to swirl some peanut butter into the chocolate as well. You haven’t lived until you’ve had a s’more with peanut butter added (have you tried my fluffernutter s’more sandwich yet? Heaven on earth) so adding a little peanut butter to the mix when making the s’mores bark is highly encouraged.

My parents made the mistake of inviting me back to work from there whenever I want (and they even offered to watch the kiddo once he comes along!) and believe-you-me, I’m going to be taking full advantage of that offer!
But until then: gluten-free S’MORES BARK to the rescue!
S’mores Bark [Gluten-Free]
- 12 oz. high-quality dark chocolate
- ⅓ cup white chocolate (about 4 oz.)
- 1 cup mini marshmallows
- 8 gluten-free graham crackers, roughly chopped*
- 1 chocolate candy bar, roughly chopped
- First of all, Line a large baking sheet with a silicone baking mat or parchment paper.
- After this, Melt the dark chocolate in a double boiler or in the microwave. If using the microwave, be sure to heat the chocolate in a microwave safe glass bowl under medium power and stir after every 30 second interval. Pour the melted chocolate onto your prepared baking sheet, and spread into a thin layer in a rectangular shape.
- Moving quickly, melt the white chocolate in a separate bowl, and then drizzle over the top of the dark chocolate in lines. Using a knife or toothpick, swirl the two layers together by dragging the utensil in a zigzag pattern. Sprinkle graham cracker pieces evenly over the top of the chocolate layers, followed by the mini marshmallows.
- Turn your broiler on to LOW, and place the bark inside the oven, keeping a close watch the entire time. After this, Remove the bark from the oven as soon as the marshmallows begin to turn golden brown and tasty, anywhere from approximately 15 seconds to 2 minutes. Once the bark is out of the oven, place the chocolate bar pieces on top.
- Allow the chocolate to set at room temperature for 1 to 2 hours. To speed the setting process up, you can place in the refrigerator for 30 minutes.
- Once hardened, break into chunks, and enjoy!
![Gluten-Free Red Velvet Crinkle Cookies [+Dairy-Free] – Grain Changer](https://news.culinaryhill.co.uk/wp-content/uploads/2026/05/1001006-Gluten-Free-Red-Velvet-Crinkle-Cookies-2.jpg)