Pepper belly pete chili recipe
Welcome, I’m happy you’re here.
I’m talking about my version of Pepper belly pete chili recipe. I’ve seen a few requests for it, so I tweaked my own recipe to match that hearty, no-frills diner style. It’s the kind of chili that sticks to your ribs.
Pepper Belly Pete’s Chili (My Home Version)
I’ve made this dish more times than I can count. Seriously. If my college friends are coming over to watch the game, they text me “Is the chili happening?” If my relatives are in town, I make a double batch. It’s just the easiest thing to throw together that feeds a crowd and makes everyone happy.
Hi, my name is Lee Harsh. I like cooking food for my family, relatives, and college friends. My friends call me a pro chef. I need only the ingredients i make the recipe for my own recipe method.
Why It Works
- It uses simple ground beef. No expensive cuts needed.
- The spices are just right. Big flavor, but not “hot” just for the sake of it.
- It gets better the next day. Leftovers are a gift.
| Cuisine | American, Diner-Style | |
| Prep Time | 15 minutes | |
| Cook Time | 1 hour 30 minutes | |
| Servings | 6-8 people |
What This Chili Really Is
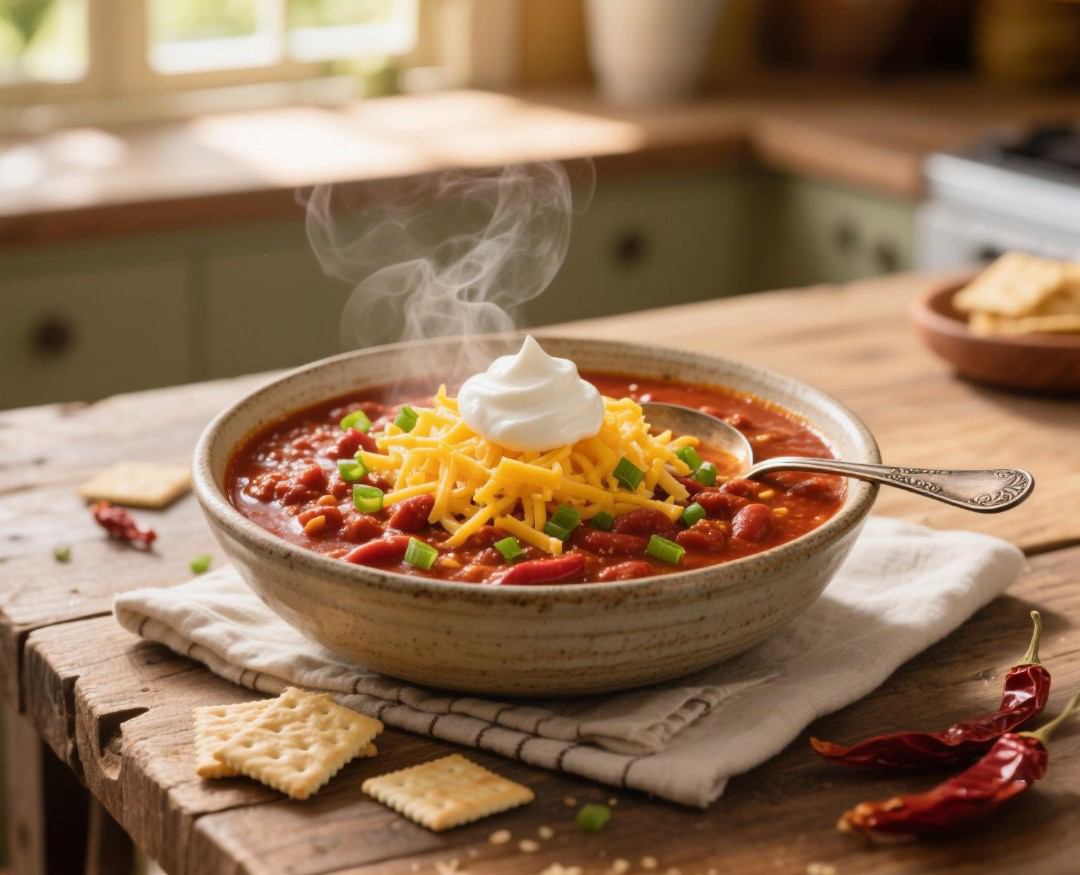
This isn’t a five-alarm competition chili. It’s not a thin soup, either. It’s a thick, meaty, and hearty bowl of comfort. It’s the kind of chili you’d hope to get at a busy downtown diner, served with a stack of saltines on the side.
Why This Style Is So Loved
It’s the texture for me. You get the tender ground beef, the soft beans, and a gravy that coats the back of a spoon. It’s familiar. It tastes like something you’ve had before, maybe at a school fair or a family potluck, and that’s why people love it.
Why I Personally Love Making It
Honestly? The peace of mind. Once it’s in the pot, I just stir it every now and then. I can hang out with my friends, have a drink, and not be stuck in the kitchen. It’s also nearly impossible to mess up, which takes all the stress out of hosting.
Key Ingredients & Choosing the Right Items
- Ground Beef: I use 80/20 ground chuck. You need a little fat for flavor. Don’t get the super lean stuff or your chili will be dry.
- Tomatoes: I swear by Ro-Tel (tomatoes and green chilies) for this. It adds a little kick that’s perfect. If you can’t find it, use a can of diced tomatoes with a small can of green chilies.
- Beans: This is a personal choice. I use dark red kidney beans. They hold their shape well. Don’t use “chili beans” in sauce, just get the plain canned ones and rinse them.
- Chili Powder: This is the star. Don’t use the fancy gourmet stuff. Just get a standard brand like McCormick. It has a blend of spices already in it that works perfectly here.
Equipment
| Amount | Equipment | Notes |
|---|---|---|
| 1 | Large Heavy-Bottomed Pot | A Dutch oven is best, but any large soup pot works. |
| 1 | Wooden Spoon | For stirring and breaking up the meat. |
| 1 | Sharp Knife | For chopping the onion. |
| 1 | Cutting Board |
Ingredients
| Amount | Unit | Ingredient | Notes |
|---|---|---|---|
| 2 | lbs | Ground Beef (80/20) | |
| 1 | large | Yellow Onion | Diced small. |
| 4 | cloves | Garlic | Minced. |
| 1 | can (10 oz) | Ro-Tel (Original) | Do not drain. |
| 1 | can (15 oz) | Tomato Sauce | |
| 1 | can (6 oz) | Tomato Paste | |
| 1 | can (15 oz) | Dark Red Kidney Beans | Rinsed and drained. |
| 2 | tbsp | Chili Powder | |
| 1 | tbsp | Ground Cumin | |
| 1 | tsp | Smoked Paprika | |
| 1 | tsp | Dried Oregano | |
| 1/2 | tsp | Cayenne Pepper | Optional, for heat. |
| 1 | cup | Beef Broth | Or water. |
| Salt and Black Pepper | To taste. |
How I Prepare the Pepper Belly Pete’s Chili
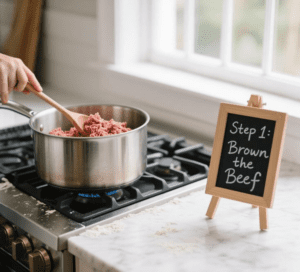
Step 1: Brown the Beef
I start by putting my big pot over medium-high heat. I add the ground beef and let it sit for a minute before breaking it up. I use my wooden spoon to break it into small crumbles. I cook it until no pink is left.
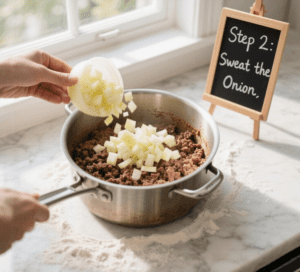
Step 2: Sweat the Onion
I push the beef to one side of the pot. I add the diced onion to the empty space with a pinch of salt. I cook it for about 5 minutes until it goes soft. Then I stir it all together with the meat.
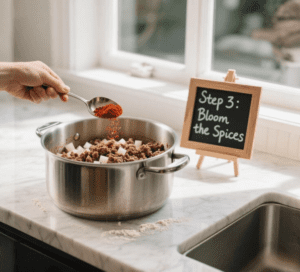
Step 3: Bloom the Spices
I add the garlic, chili powder, cumin, oregano, smoked paprika, and cayenne (if using). I stir it constantly for one minute. This wakes the spices up. Your kitchen will smell amazing right now.
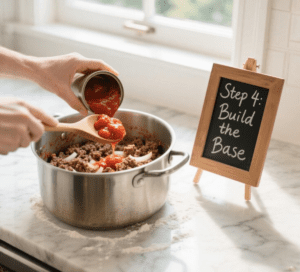
Step 4: Build the Base
I add the tomato paste and stir it in for another minute. Then I pour in the can of Ro-Tel (juice and all) and the tomato sauce. I stir well, scraping the bottom of the pot to get all the flavor bits up.
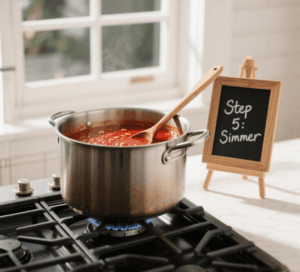
Step 5: Simmer Low and Slow
I add the beef broth and stir everything together. I bring it to a bubble, then turn the heat down to low. I put a lid on it, but tilted so steam can escape. I let it simmer for one hour, stirring every 15 minutes or so.
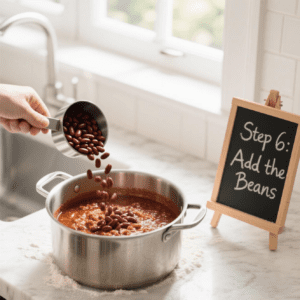
Step 6: Add the Beans
After an hour, I stir in the rinsed kidney beans. I let it cook for another 20-30 minutes, uncovered this time. This helps it thicken up. I taste it and add salt and pepper.
How I Tell It’s Done
The chili is ready when it’s thick enough that if you drag your spoon across the bottom of the pot, it leaves a trail that doesn’t immediately fill back in with liquid. The meat will be very tender and the flavors will have melded together.
Common Mistakes & Troubleshooting
- Burnt Chili: If you burn the bottom, do not stir it in. Carefully transfer the unburnt chili to a new pot. The burnt taste will ruin the whole batch.
- Thin Chili: If it’s too soupy at the end, just take the lid off and let it simmer for 10-15 minutes. If you’re in a hurry, mash some of the beans against the side of the pot to release their starch and thicken it.
- Too Greasy: If you see a pool of orange grease on top, you can either spoon it off, or drop a few ice cubes in and let the fat solidify around them, then remove the cubes. I usually just spoon it off.
Planning and Storage
This chili is a dream for meal prep.
- Fridge: It keeps in an airtight container for up to 5 days. The flavor actually gets better on day 2 and 3.
- Freezer: It freezes perfectly for up to 3 months. I put it in quart-sized freezer bags and lay them flat to save space.
Serving Ideas
- Classic style: In a bowl with a handful of shredded cheddar cheese and a spoonful of sour cream.
- With Fritos for a Frito Pie. Just dump Fritos in a bowl and ladle chili over the top.
- On a hot dog. My nephew loves a “chili dog” more than anything.
- With a side of warm cornbread or saltine crackers.
Nutrition Notes
- High in Protein: From the ground beef and kidney beans.
- Good Source of Fiber: The beans provide a solid amount of dietary fiber.
- Rich in Iron: Beef and beans are both great for iron.
- Contains Lycopene: From the cooked tomatoes, which is a great antioxidant.
- Customizable Fat: Using 80/20 beef adds flavor, but you can drain the fat after browning if you prefer.
Frequently Asked Questions
Can I make this in a slow cooker?
Absolutely. Brown the beef and soften the onions on the stove first. That step matters. Then dump everything except the beans into your slow cooker. Cook on low for 6-8 hours or high for 3-4. Stir in the beans during the last 30 minutes.
Do I have to use Ro-Tel?
No, you don’t. I really like the little kick it gives. But if you can’t find it, use one can of diced tomatoes and one small can (4 oz) of chopped green chilies. That gets you close.
Is this chili spicy?
It has a warm, mild kick. My kids eat it just fine. The cayenne is optional. If you leave it out, it’s very family-friendly. If you want more heat, add a diced jalapeño with the onions.
Why do you rinse the beans?
Two reasons. First, the liquid in the can is starchy and salty. It can make your chili gloppy and too salty. Second, rinsing gives you control over the thickness. You add the liquid you want, not the can liquid.
Can I use ground turkey or chicken?
Sure thing. Just know that poultry is leaner. Your chili might be a little less rich. I’d add a tablespoon of olive oil when browning to make up for the missing fat. It will still be tasty.
My chili tastes a little flat. What did I do wrong?
It probably needs salt. Or acid. Try adding another pinch of salt first. Stir and taste. If it’s still flat, add a tiny splash of vinegar or a squeeze of lime juice. That brightness wakes everything up.
Recipe Variations
Turkey Tail Chili
Swap the ground beef for ground turkey. Use chicken broth instead of beef broth. Add an extra tablespoon of chili powder. It’s a little lighter but still hits the spot.
Smokey Mountain Version
Add 8 ounces of diced smoked sausage or sliced andouille with the onions. Swap the regular paprika for all smoked paprika. It gives it a deep, campfire taste.
Vegetarian Bean Pot
Skip the meat. Add an extra can of kidney beans and a can of black beans. Dice up a bell pepper and cook it with the onions. Use vegetable broth. It’s hearty and fills you up just fine.
Extra Chunky Style
Brown a pound of stew meat or chuck roast cubes along with the ground beef. Let it simmer the full time until the chunks fall apart with a fork. It changes the whole texture in a great way.
Cincinnati Style
Add a tablespoon of unsweetened cocoa powder and a teaspoon of cinnamon with the other spices. Serve it over spaghetti with a mountain of shredded cheddar on top. It sounds strange. Trust me, it works.
My Personal Kitchen Tips
I’ve learned not to rush the simmer. That hour of quiet cooking is where the magic happens. Also, always taste before you serve. Sometimes it needs just one more pinch of salt to make everything pop. Finally, make it the day before you need it. I promise, day-old chili is always better.
Pepper belly pete chili recipe
Ingredients
Equipment
Method
- I start by putting my big pot over medium-high heat. I add the ground beef and let it sit for a minute before breaking it up. I use my wooden spoon to break it into small crumbles. I cook it until no pink is left.

- I push the beef to one side of the pot. I add the diced onion to the empty space with a pinch of salt. I cook it for about 5 minutes until it goes soft. Then I stir it all together with the meat.
- I add the garlic, chili powder, cumin, oregano, smoked paprika, and cayenne (if using). I stir it constantly for one minute. This wakes the spices up. Your kitchen will smell amazing right now.
- I add the tomato paste and stir it in for another minute. Then I pour in the can of Ro-Tel (juice and all) and the tomato sauce. I stir well, scraping the bottom of the pot to get all the flavor bits up.
- I add the beef broth and stir everything together. I bring it to a bubble, then turn the heat down to low. I put a lid on it, but tilted so steam can escape. I let it simmer for one hour, stirring every 15 minutes or so.
- After an hour, I stir in the rinsed kidney beans. I let it cook for another 20-30 minutes, uncovered this time. This helps it thicken up. I taste it and add salt and pepper.